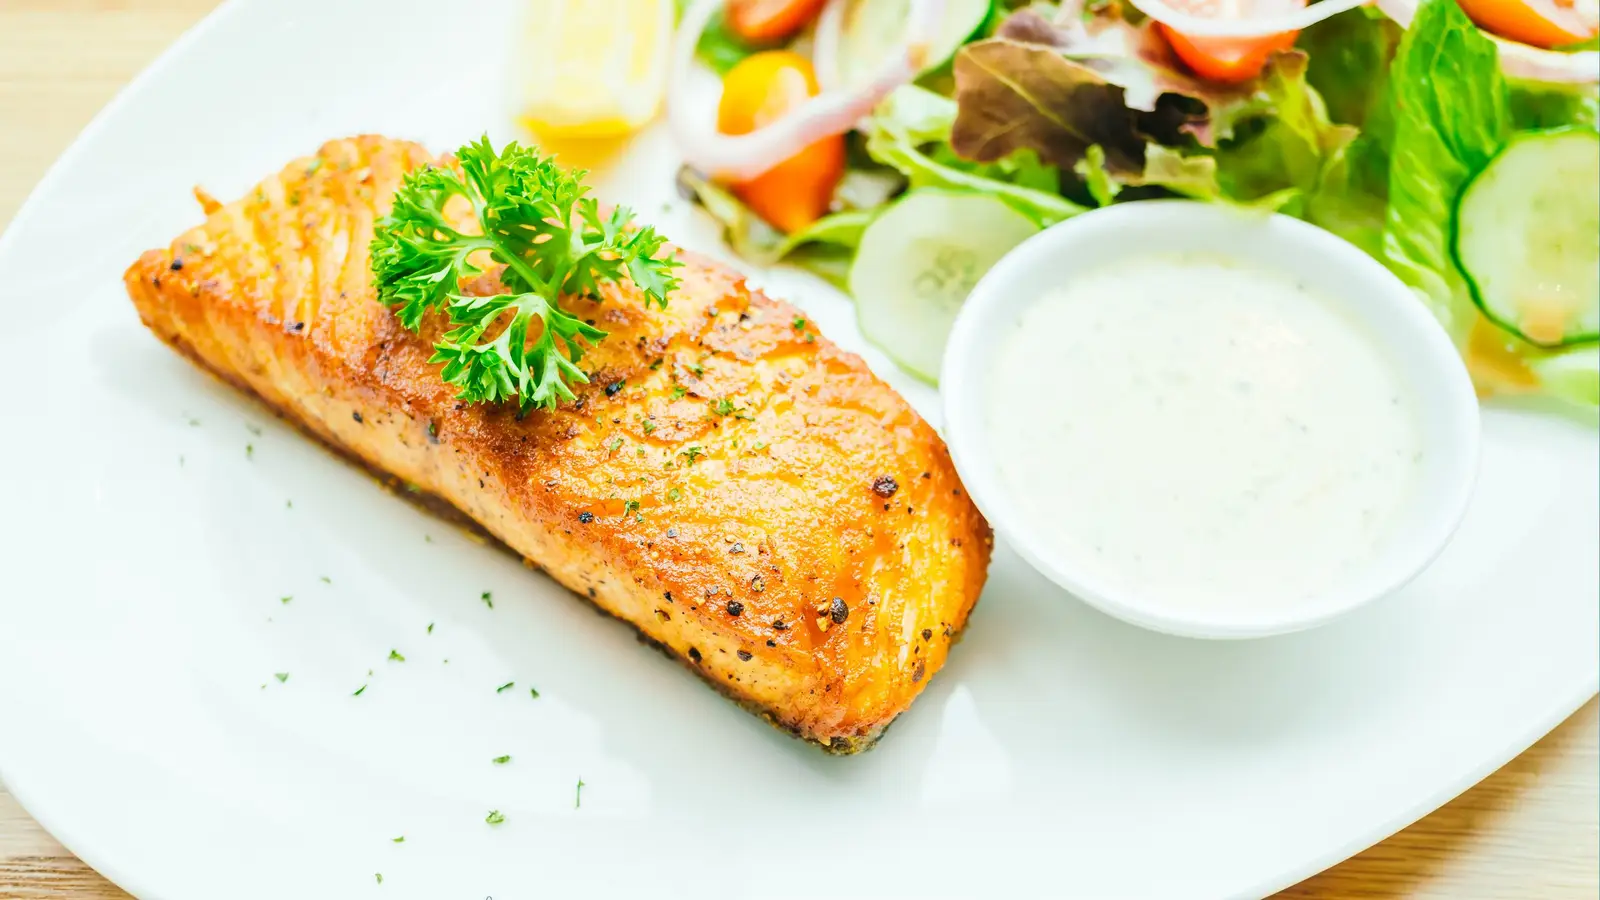
How to Pan-Fry Salmon with Crispy Skin on an Induction Hob
Crispy-skinned salmon is one of those results that looks impressive but comes down to a handful of simple principles: dry skin, a properly preheated pan, and the discipline to leave it alone. Induction hobs make this easier than most other cooking methods because the temperature response is immediate and precise — which matters a great deal when the difference between golden and burnt is twenty seconds.
The Recipe
Pan-Fried Salmon with Crispy Skin
Golden, crisp skin and tender, just-cooked flesh. Simple enough for a weeknight, good enough for guests.
Ingredients
- Salmon fillets, skin-on2 (150–200g each)
- Olive oil1 tbsp
- Flaky sea saltgood pinch
- Black pepperto taste
- Butter (optional)15g
- Lemon wedges, to serve2
Method
- 1Pat the salmon fillets completely dry with kitchen paper on both sides. Dry skin is the single most important factor in achieving a crisp result. Season skin-side and flesh-side with salt and pepper.
- 2Place your pan on the hob over a medium-high setting. Add the oil and allow it to heat until it shimmers and flows freely — about 2 minutes. The pan needs to be genuinely hot before the fish goes in.
- 3Lay the salmon skin-side down. As soon as it touches the pan, press gently but firmly with a flat spatula for 15 to 20 seconds. This prevents the fillet curling and ensures the whole skin makes contact with the pan.
- 4Reduce the induction setting to medium. Leave the salmon completely undisturbed for 4 to 6 minutes depending on thickness (see timing table below). You will see the flesh turning from translucent to opaque from the bottom up — when it is about two-thirds of the way up the fillet, it is ready to flip.
- 5Flip once and cook for 1 to 2 minutes on the flesh side. If using butter, add it now and tilt the pan slightly to baste the fish with the foaming butter as it melts.
- 6Transfer to a warm plate and leave to rest for a full minute. The carry-over heat finishes the centre without drying it out. Serve skin-side up to preserve the crispness.
Notes
- Pan choice: stainless steel or cast iron both work well. Non-stick is fine but produces slightly less defined crackling on the skin. Make sure the pan is induction-compatible — a magnet should stick firmly to the base.
- The fish sticks test: if the salmon resists lifting when you try to flip it, it is not ready. Give it another 30 seconds. A properly crisped skin releases naturally from the pan.
- Skin-on or skinless: for a crispy result, skin-on is essential. If you only have skinless fillets, skip the pressing step and reduce the initial cooking time by 30 to 45 seconds.
- Doneness: salmon is ready when the flesh has changed colour two-thirds of the way up and the thickest part yields slightly but not wetly when pressed. Internal temperature of 52°C to 55°C gives a just-cooked, slightly translucent centre; 60°C is fully cooked through.
Cooking Time by Fillet Thickness
Salmon fillet thickness varies considerably depending on where the fillet has been cut from — a tail piece is much thinner than a cut from the thickest part of the fish. Use these timings as a starting point and adjust based on what you see in the pan.
| Fillet thickness | Skin-side (medium heat) | Flesh-side | Result |
|---|---|---|---|
| 2 cm (thin / tail cut) | 3 to 4 min | 30 to 60 sec | Cooked through, no raw centre |
| 2.5 to 3 cm (standard) | 4 to 5 min | 1 to 1.5 min | Slightly translucent centre — ideal |
| 3.5 to 4 cm (thick / centre cut) | 5 to 6 min | 2 min | Just-set throughout with moist flake |
Mistakes to Avoid
Not drying the skin
This is the most common reason salmon skin comes out pale and soft rather than crisp. Moisture on the surface creates steam between the skin and the pan, which prevents direct contact and browning. Dry the skin thoroughly — more than you think is necessary — immediately before cooking.
Starting with a cold or underpowered pan
The pan must be genuinely hot before the fish goes in. A pan that is only warm will cause the salmon to stew in its own moisture rather than sear. Allow two full minutes at medium-high on the induction setting before adding the oil, and another minute after the oil goes in.
Moving the fish
Pressing the fillet down in the first 20 seconds is the only intervention needed. After that, leave it completely alone. Moving the salmon before the skin has crisped tears the skin away from the flesh and disrupts the browning reaction.
Using too much oil
A tablespoon of oil in a standard frying pan is sufficient. Excess oil lowers the effective pan temperature, increases splatter, and makes it harder to achieve crisp rather than fried skin. The oil should coat the base of the pan in a thin, even layer.
Flipping too soon
The skin is ready to flip when it releases naturally from the pan. If you try to lift it and it resists, it is not done. The colour change visible from the side of the fillet is your other guide — wait until it has moved about two-thirds of the way up the flesh before flipping.
Why Induction Works Particularly Well for Fish
Fish is one of the most unforgiving proteins to cook precisely. The window between underdone and overdone is narrow, and the difference between a salmon fillet that is just-set in the centre and one that is dry and chalky is often a matter of thirty seconds at cooking temperature. Induction hobs make this easier in two specific ways.
Immediate temperature response
When you reduce the induction setting, the heat in the pan drops within seconds rather than over a minute or more. On gas or ceramic, the element continues radiating heat after you turn it down. With induction, the pan cools as fast as you need it to — which is exactly what you want when a piece of fish is approaching perfect doneness.
Precise power settings
The stepped power settings on an induction hob give you consistent, repeatable results. Once you know that medium on your hob produces a 4-minute skin on a 3cm fillet, you can reproduce that result every time. Gas varies with pressure and pan position; ceramic varies with element temperature. Induction is inherently consistent.
Even heat across the pan base
Induction heats the pan base directly and evenly across the coil’s footprint. There are no hot spots from a gas ring concentrated at the centre, and no slow edges from a ceramic element. For a fillet that may be thinner at the tail end than the thick end, even pan heat gives you more control over how the whole piece cooks.
Cool surface — less ambient heat
The induction hob’s glass surface stays largely cool during cooking. This means the kitchen stays cooler compared to gas, and — more practically — the pan’s exterior does not receive radiated heat from the hob surface itself. The only heat affecting the fish comes from the pan base you control.
For best results with this recipe, use a stainless steel or cast iron frying pan with a flat, induction-compatible base. If you are unsure whether your pan works on induction, a fridge magnet stuck firmly to the base is the reliable test. See the guide to induction-compatible cookware for the full breakdown of which materials work and why.
CATA Induction Hobs for Everyday Cooking
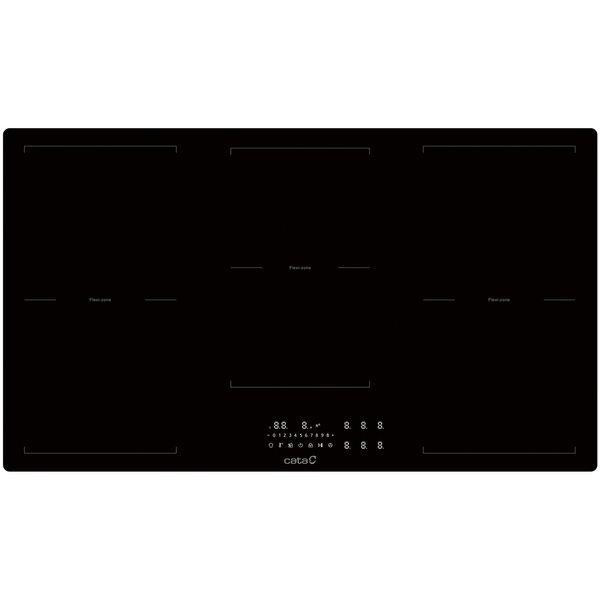
CATIND90HF — CATA 700 90cm Flex Zone Induction Hob
Six cooking zones with flex zone bridging across the full 90cm width. Ideal for cooking multiple dishes simultaneously with full independent zone control and boost function on every zone.
View product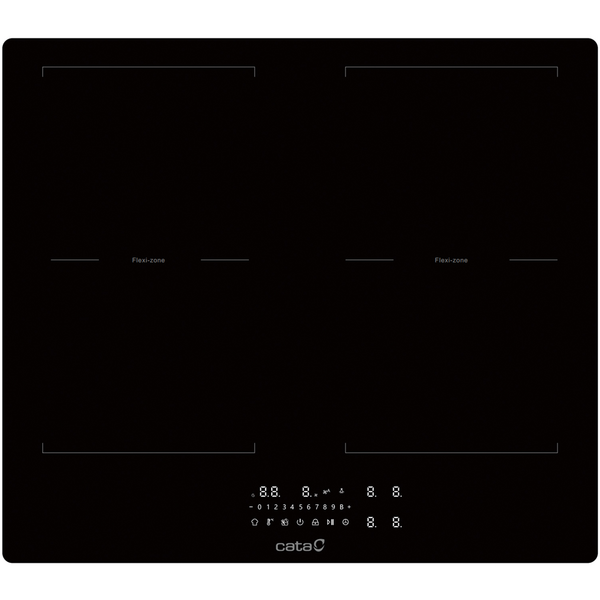
CATINDE60HF — CATA 700 60cm 4 Zone Plug-In Induction Hob
Four zones with flex zone capability and a 13A plug-in connection — no dedicated circuit required. A straightforward upgrade from ceramic or gas with minimal installation work.
View product