Cooker Hood Grease Filter: Cleaning and Replacement Guide
A clogged grease filter is the single most common reason a cooker hood loses extraction power. Metal mesh and baffle filters should be cleaned every one to three months depending on how often you cook; charcoal filters cannot be washed and need replacing every three to six months. The whole process takes under 20 minutes once you know what you are dealing with.
Filter Types Explained
Before cleaning or ordering a replacement, it helps to know which filter type your hood uses. The two jobs — capturing grease and absorbing odour — are handled by different components, and each requires a different maintenance approach.
Aluminium mesh
The most common type in UK domestic hoods. Multiple layers of woven aluminium capture grease by forcing the airstream to change direction repeatedly. Grease condenses on the mesh and runs into a collection channel.
Washable by hand or in the dishwasher. Replace only if warped, damaged, or still heavily coated after a thorough clean.
Stainless steel baffle
Found on higher-specification hoods. Pressed steel channels create sharp direction changes that separate grease from the airstream very efficiently. More durable than mesh and typically dishwasher-safe.
Long service life with regular cleaning. Replace only if physically damaged or no longer seated securely in the hood.
Charcoal (activated carbon)
Used in recirculating hoods to absorb cooking odours before air is returned to the kitchen. Does not capture grease — that job belongs to the mesh or baffle filter fitted alongside it.
Cannot be regenerated by washing. Needs replacing every three to six months regardless of appearance, as the activated carbon becomes saturated invisibly over time.
Paper or synthetic foam
Found in older or budget models. Designed for single use — once saturated they cannot be effectively cleaned. Performance drops sharply as they become clogged.
Replace when visibly saturated or at the interval specified in the hood manual. Do not attempt to wash or reuse.
If your hood recirculates air rather than ducting it outside, it almost certainly contains both a washable grease filter and a charcoal odour filter. Both need maintenance, but on different schedules. For a full explanation of how each type removes grease from cooking air, see the guide to how cooker hoods remove grease from the air.
Removing the Filter
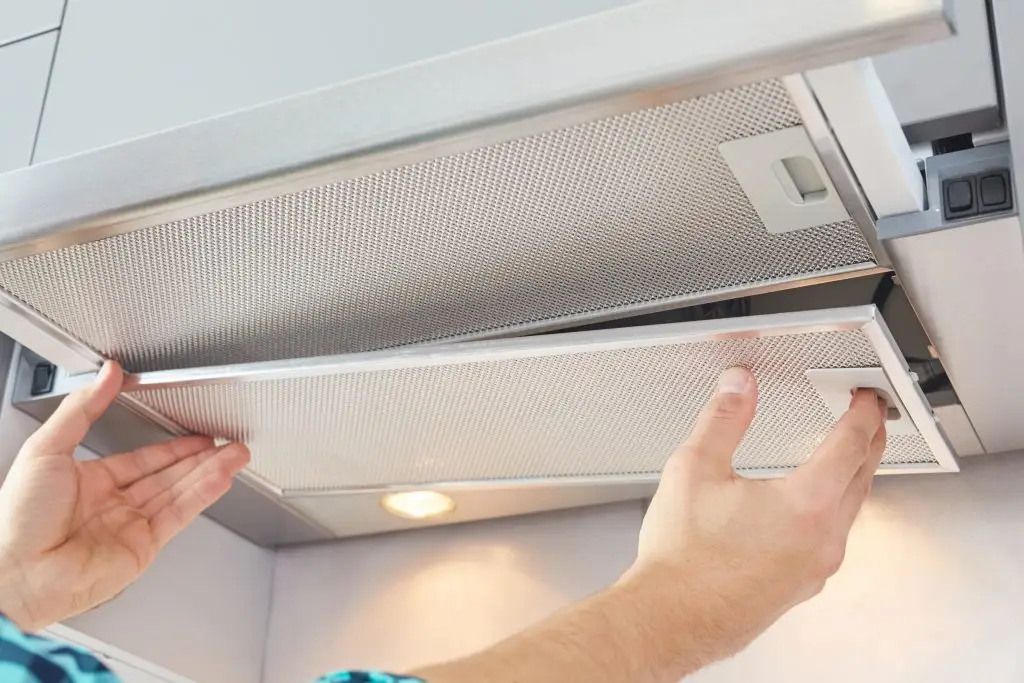
On the vast majority of cooker hoods, removing the grease filter is a tool-free job that takes under a minute. The mechanism varies slightly between designs but the principle is the same across almost all models.
- 1
Switch the hood off and let it cool
If you have been cooking, allow the hood to cool before handling the filter. The mesh or baffle can retain heat for several minutes after the fan stops, and any grease on the surface will be hot and fluid immediately after cooking.
- 2
Locate the release mechanism
Look at the underside of the hood where the filter is visible through the grille or canopy. Most filters are held by one or two spring clips, a sliding latch, or a simple push-and-rotate catch. On some integrated hoods the grille panel must be removed first to access the filter catch.
- 3
Support and release in one motion
Place one hand beneath the filter to support its weight, then release the catch with your other hand. Mesh filters in particular can flex if handled by one edge — supporting from below prevents warping and catches any accumulated grease liquid before it drips onto the hob.
- 4
Lower carefully
Lower the filter straight down rather than tipping it sideways. A heavily loaded mesh filter can have liquid grease sitting in the channels — tipping it sideways can send this across your hob or work surface. Take it immediately to the sink or place it flat on an old newspaper.
If the filter does not release easily, check your hood’s manual before applying more force. Some models use a slightly recessed catch that is easy to miss, and a few use small screws at the corners that must be removed first. Forcing a stuck filter risks bending the frame, which can prevent it from sitting flat when reinstalled.
How to Clean a Grease Filter
Aluminium mesh and stainless steel baffle filters can be cleaned by hand or in the dishwasher. The right method depends on how heavy the grease build-up is and what your hood manufacturer recommends.
Hand washing gives the best results when grease build-up is heavy or has been left to solidify. Hot water and a degreasing product break down the fat in a way that the dishwasher’s spray alone may not achieve on a very loaded filter.
- Fill a sink or large basin with the hottest water you can manage — the hotter the better for dissolving solidified grease.
- Add a generous squeeze of washing-up liquid, a kitchen degreaser, or dissolve two to three tablespoons of bicarbonate of soda in the water for particularly heavy grease.
- Submerge the filter and leave it to soak for 10 to 20 minutes. You will often see the water change colour as grease lifts off.
- Use a soft-bristled brush or non-abrasive sponge to work through the mesh channels. A washing-up brush with a long handle reaches into the layers more effectively than a flat sponge.
- Rinse thoroughly with hot clean water and hold up to the light to check the mesh is clear — you should be able to see daylight through it.
- Leave flat to dry completely before reinstalling. A damp filter promotes residue accumulation in the first use after cleaning.
The dishwasher method is quicker and requires no effort during the cycle, but works best for regular maintenance cleaning rather than removing several months of accumulated grease in one go. Check your hood’s manual first — most metal filters are dishwasher-safe, but some manufacturers specify hand washing only.
- Check the filter fits in your dishwasher without forcing it — most standard mesh filters fit diagonally in the lower basket, or upright if the basket is deep enough.
- Run the hottest cycle available. A 65°C or 70°C programme dissolves cooking grease far more effectively than a standard 55°C wash.
- Avoid washing the filter in the same load as delicate glassware — the hot programme and degreasing detergent that works well on the filter is too aggressive for fine glass.
- Allow the filter to dry fully in the open air after the cycle rather than reinstalling it warm and damp.
- If the filter still shows significant grease residue after a dishwasher cycle, follow up with a hand soak before the next use.
Note: aluminium mesh filters may discolour slightly over repeated dishwasher cycles — this is cosmetic and does not affect performance. Baffle filters are more resistant to discolouration.
When to Replace Rather Than Clean

A well-maintained metal grease filter should last the life of the appliance. The cleaning cycle does not significantly degrade the material, and a baffle filter cleaned regularly will be just as effective after ten years as it was when new. But there are specific situations where replacement is the right call rather than attempting another clean.
- Persistent grease after thorough cleaning. If the mesh is still visibly coated after a proper hot soak and scrub, the filter has accumulated oxidised grease that has bonded to the metal surface. A new filter will restore full airflow.
- Warped or bent frame. A filter that no longer sits flat in its housing leaves gaps around the edges that bypass the filter entirely. Grease passes directly into the hood internals rather than being captured.
- Damaged mesh or broken baffle channels. Tears in aluminium mesh or cracked baffle sections reduce the filter’s grease-capture efficiency. These cannot be repaired effectively.
- Charcoal filter — any time after three to six months. Activated carbon becomes saturated invisibly. A charcoal filter that looks clean may have zero remaining odour absorption capacity. Replace on schedule regardless of appearance.
- Hood still underperforming after a clean filter is fitted. If extraction power has not improved after fitting a clean or new filter, the issue is elsewhere — ductwork restriction, fan condition, or a charcoal filter in need of replacement on a recirculating model.
When ordering a replacement, find the model number on the rating plate inside the hood canopy and use it to source the correct filter. Filters are not universal — even within the same brand, different models use different frame sizes and catch systems. CATA’s full cooker hood range includes product support and parts guidance for each model.
How Often: A Guide by Usage
The right cleaning interval is driven by your cooking habits more than by the calendar. A household that fries every day will load the filter significantly faster than one that mostly boils and steams. Use the table below as a starting point and adjust based on how quickly your filter visibly loads up between cleans.
| Usage level | Metal grease filter | Charcoal filter | Signs you need to act sooner |
|---|---|---|---|
| Occasional cooking (3 to 4 times a week, mostly boiling and steaming) | Every 2 to 3 months | Every 6 months | Visible grease pooling; odours lingering after cooking |
| Regular daily cooking, mixed methods | Every 4 to 6 weeks | Every 4 months | Reduced fan suction; cooking smells taking longer to clear |
| Daily high-heat cooking with frequent frying or grilling | Every 3 to 4 weeks | Every 3 months | Filter visibly saturated; fan audibly struggling; grease dripping |
A useful habit: check the filter whenever you clean the hob. If you can see grease pooling in the mesh channels or the filter feels heavy when you lift it, clean it that day rather than waiting for the scheduled interval. Catching it early means a 10-minute soak; leaving it too long means 30 minutes of scrubbing.
Running the hood for a few minutes after you finish cooking, rather than switching it off immediately, draws residual grease vapour through the filter before it condenses on cooler surfaces inside the canopy. It also extends the interval between filter cleans by ensuring grease is captured in the filter rather than settling on the internal housing. Browse CATA’s cooker hood range for models with grease saturation indicators that take the guesswork out of the cleaning schedule.
Troubleshooting
Hood still smells after a clean filter
On a recirculating model, the charcoal filter is almost certainly the cause — grease filters do not absorb odours. Replace the charcoal filter. On a ducted model, check the external vent for obstruction and whether the duct run needs cleaning internally.
Filter is clean but extraction is still weak
Check the charcoal filter if fitted — a saturated carbon filter restricts airflow significantly. Also check that the external duct vent is fully open and unobstructed. A bent duct run or undersized ducting diameter reduces effective extraction rate regardless of filter condition.
Filter will not release
Look for a secondary catch that is not immediately visible — some models have a small recessed latch inside the canopy trim. Check the manual for your specific model before applying force. Grease can sometimes cause a catch to stick; a brief spray of kitchen degreaser around the mechanism may help it release.
Filter still greasy after dishwasher
The grease build-up has likely oxidised and bonded to the mesh surface over time. Soak in very hot water with a dedicated kitchen degreaser for 20 to 30 minutes before scrubbing. If it remains heavily coated after two proper cleans, the filter is overdue for replacement.
Grease dripping from the hood during cooking
This indicates the filter is fully saturated and has reached its capacity. Grease that cannot be captured is passing through and condensing on the internal surfaces of the canopy before dripping. Clean or replace the filter immediately and wipe down all internal canopy surfaces before the next use.
Fan is noisier than usual
Increased noise often indicates the motor is working harder than normal due to restricted airflow — a clogged filter is the first thing to check. If cleaning the filter does not resolve the noise, and the ductwork is clear, the fan motor or impeller may need inspection by a service engineer.